Quick start

Here’s an overview of how you can start building with Moov. Once you have your API keys, you can start the process of developing your application.

tip
Be sure to read up on Moov’s core concepts.

Server-side authentication

When developing a server-side integration, you can simply use your API key’s public and private keys with Basic authentication.

Set the Authorization header to Basic <credentials> where credentials is the Base64 encoding of public key and private key joined by a single colon :.

Only use this method if you are developing a server-side integration. If you are developing a client-side integration, use OAuth instead.

OAuth with JWT

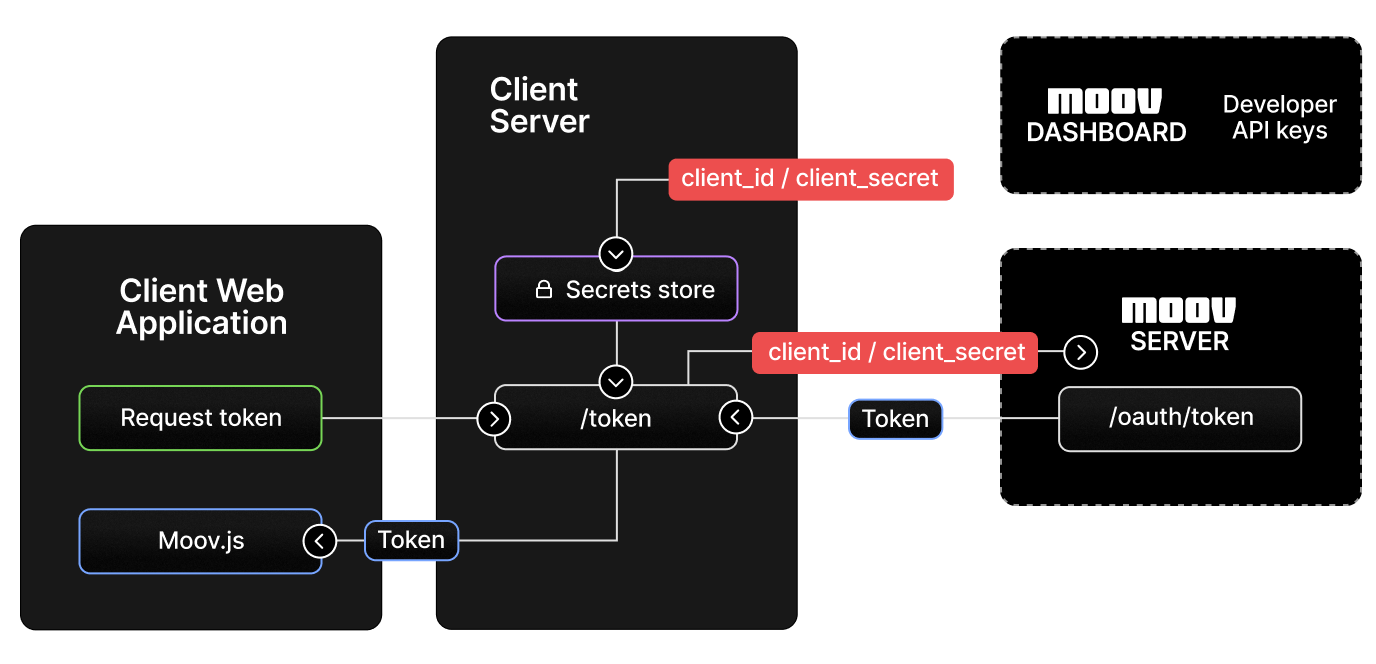
When making requests to Moov from a browser, you can use OAuth with JSON Web Tokens (JWT).

Within your server-side application, you’ll generate a single-use access token containing information needed to communicate with your Moov account securely. Once you’ve generated this token, you can send it back to your client to use with Moov.js.

Diagram showing token generation process

Add Moov.js

Moov.js is a browser client that collects PII data so you don’t have to be responsible for handling and storing sensitive customer information. Use Moov.js to expedite setting up your payments flow and streamline your interactions with the Moov API.

You can add Moov.js to your web application by including the script tag.

1
2
3
4
<script type="text/javascript" src="https://js.moov.io/v1"></script>
<script>
  const moov = Moov(token)
</script>

Or you can install via npm.

1
npm i @moovio/moov-js
1
2
3
4
import { loadMoov } from '@moovio/moov-js';

const moovAccessToken = await fetch(...); // Use your server to get a Moov access token with appropriate scopes
const moov = await loadMoov(moovAccessToken);

Create an access token

For each action you take you will need a unique short lived access token. The example below generates a token that can create a new account using the /accounts.write scope.

 1
 2
 3
 4
 5
 6
 7
 8
 9
10
11
12
13
14
15
16
import { Moov, SCOPES } from '@moovio/node';

const moov = new Moov({
  accountID: "YOUR_MOOV_ACCOUNT_ID",
  publicKey: "PUBLIC_KEY",
  secretKey: "PRIVATE_KEY",
  domain: "YOUR_DOMAIN"
});

const scopes = [SCOPES.ACCOUNTS_CREATE];
try {
  const {token} = await moov.generateToken(scopes);
  // Do something with token
} catch(err) {
  // Handle any errors
}
1
2
3
4
5
curl -X POST "https://api.moov.io/oauth2/token" \
  -u "client_id:client_secret" \
  -H "Content-Type: application/x-www-form-urlencoded" \
  --data-urlencode "grant_type=client_credentials" \
  --data-urlencode  "scope=/accounts.write" \

If you make calls from a browser to Moov without using Moov.js, you can include the access token in the Authorization header.

1
2
3
const headers = {
  'Authorization': `Bearer ${token}`
};

Scopes

A scope is a permission that determines the limits of what a specific account can do on another account. For example, you may want an account to request money from another account but not pull money from another account. In other instances, you may want to set the scope for an account only to receive money from other accounts.

Create an account

To start paying others, you can set up others with Moov accounts. If you’d like to link a Moov account to an account in your system, you have the option to pass a foreign ID.

This scope is required in order to create the access token:

1
/accounts.write
tip
Use Moov.js to collect sensitive information from your users without handling the data on your servers.
 1
 2
 3
 4
 5
 6
 7
 8
 9
10
11
12
13
const moov = Moov(token);

const account = await moov.accounts.create({
  "accountType": "business",
  "profile": {
    "business": {
      "legalBusinessName": "Whole Body Fitness LLC",
      "businessType": "llc",
    }
  },
  "foreignId": "your-correlation-id",
  "capabilities": ["transfers"]
})
 1
 2
 3
 4
 5
 6
 7
 8
 9
10
11
12
13
const moov = new Moov({});

const account = await moov.accounts.create({
  "accountType": "business",
  "profile": {
    "business": {
      "legalBusinessName": "Whole Body Fitness LLC",
      "businessType": "llc",
    }
  },
  "foreignId": "your-correlation-id",
  "capabilities": ["transfers"]
})
 1
 2
 3
 4
 5
 6
 7
 8
 9
10
11
12
13
14
15
curl -X POST "https://api.moov.io/accounts" \
  -H 'Authorization: Bearer {token}' \
  -H "Content-Type: application/json" \
  -H "Origin: https://api.moov.io" \
  -data-raw '{
    "accountType": "business",
    "profile": {
      "business": {
        "legalBusinessName": "Whole Body Fitness LLC",
        "businessType": "llc",
      }
    },
    "foreignId": "your-correlation-id",
    "capabilities": ["transfers"]
  }'\

Request capabilities

Capabilities indicate what the account is able to do. You can specify capabilities when the account is created, as shown above, or add them later.

Below we show the required scope for creating the access token for requesting capabilities. Replace {accountID} with the ID of the account you want to request the capability for. To learn more about capabilities or find out which ones you need, you can read more in the capabilities guide.

1
/accounts/{accountID}/capabilities.write
 1
 2
 3
 4
 5
 6
 7
 8
 9
10
11
const moov = Moov(token);

const accountID = accountID;
const capabilities = [
  "transfers", 
  "send-funds", 
  "collect-funds", 
  "wallet"
];

moov.accounts.capabilities.request({accountID, capabilities});
1
2
3
const moov = new Moov({});

const response = await moov.capabilities.requestCapabilities('accountID', ['transfers', 'collect-funds']);
 1
 2
 3
 4
 5
 6
 7
 8
 9
10
11
12
curl -X POST "https://api.moov.io/accounts/{accountID}/capabilities/{capabilityID}" \
  -H 'Authorization: Bearer {token}' \
  -H "Content-Type: application/json" \
  -H "Origin: https://api.moov.io" \
  -data-raw '{
    "capabilities": [
      "transfers", 
      "send-funds", 
      "collect-funds", 
      "wallet"
    ]
  }'\

If you’re requesting send-funds, collect-funds, wallet, or card-issuing capabilities, that account will need to accept Moov’s terms of service. Note that this terms of service acceptance must be updated on the account via API. To do so, you’ll need to:

Add payment methods

Payment methods are created for you behind the scenes when you add a bank account, link a card, or are approved for a Moov wallet.

To move funds, you’ll need to link a bank account. Once the linked bank account is verified, you are ready to move money.

This is the required scope for creating the access token in order to add bank accounts.

1
/accounts/{accountID}/bank-accounts.write
1
/accounts/{accountID}/cards.write
1
A payment method for a wallet is added when the `wallet` capability for that account has been approved.

Add a bank account

 1
 2
 3
 4
 5
 6
 7
 8
 9
10
11
const moov = Moov(token);

const accountID = accountID;
const bankAccount = {
  "holderName": "Jules Jackson",
  "holderType": "individual",
  "accountNumber": "0004321567000",
  "bankAccountType": "checking",
  "routingNumber": "123456789"
};
moov.accounts.bankAccounts.link({accountID, bankAccount});
1
2
3
4
5
6
7
8
9
const moov = new Moov({});

const bankAccount = await moov.bankaccounts.link('accountID', {
  "holderName": "Jules Jackson",
  "holderType": "individual",
  "accountNumber": "0004321567000",
  "bankAccountType": "checking",
  "routingNumber": "123456789"
});
 1
 2
 3
 4
 5
 6
 7
 8
 9
10
11
12
13
curl -X POST "https://api.moov.io/accounts/{account_id}/bank-accounts" \
  -H 'Authorization: Bearer {token}' \
  -H "Content-Type: application/json" \
  -H "Origin: https://api.moov.io" \
  --data-raw '{
    "account": {
      "holderName": "Jules Jackson",
      "holderType": "individual",
      "accountNumber": "0004321567000",
      "bankAccountType": "checking",
      "routingNumber": "123456789"
    }
  }'\
Bank accounts added manually need to be verified via micro-deposits.

Initiate micro-deposits

1
2
3
4
5
const moov = Moov(token);

const accountID = accountID;
const bankAccountID = bankAccountID;
moov.accounts.bankAccounts.startMicroDepositVerification({accountID, bankAccountID});
1
2
3
const moov = new Moov({});

const response = await moov.bankAccounts.initMicroDeposits('accountID', 'bankAccountID');
1
2
3
curl -X POST "https://api.moov.io/accounts/{accountID}/bank-accounts/{bankAccountID}/micro-deposits" \
  -H 'Authorization: Bearer {token}' \
  -H "Origin: https://api.moov.io" \

Confirm micro-deposits

1
2
3
4
5
6
const moov = Moov(token);

const accountID = accountID;
const bankAccountID = bankAccountID;
const amounts = [12, 45];
moov.accounts.bankAccounts.completeMicroDepositVerification({accountID, bankAccountID, amounts});
1
2
3
4
5
6
7
const moov = new Moov({});

const response = await moov.bankAccounts.completeMicroDeposits(
  'accountID',
  'bankAccountID',
  [18, 21]
);
 1
 2
 3
 4
 5
 6
 7
 8
 9
10
curl -X POST "https://api.moov.io/accounts/{accountID}/bank-accounts/{bankAccountID}/micro-deposits" \
  -H 'Authorization: Bearer {token}' \
  -H "Content-Type: application/json" \
  -H "Origin: https://api.moov.io" \
  --data-raw '{
    "amounts": [
      18,
      21
    ]
  }'\

Moving money

Use a server-side integration to move money. If you need to present options to the user on which payment methods to use, use the following to get a list of available payment methods based on account ID and amount.

Get the payment method

A payment method specifies the way a Moov account will be moving money. There are several different methods for transferring money with Moov. For example, you can transfer money from the Moov wallet, or you might want to pull funds from another account through ACH debit. Before making a transfer, you will need to get a payment method.

Below we show the required OAuth scope for creating the access token in order to get a payment method.

1
/accounts/{accountID}/payment-methods.read
 1
 2
 3
 4
 5
 6
 7
 8
 9
10
11
12
13
14
15
16
17
const moov = new Moov({});

const sourceAccountID = 'SOURCE_ACCOUNT_ID';
const destinationAccountID = 'DESTINATION_ACCOUNT_ID';

const options = await moov.transfers.getTransferOptions({
  source: {
    accountID: sourceAccountID,
  },
  destination: {
    accountID: destinationAccountID
  }
  amount: {
    value: 100, 
    currency: "USD"
  }
});
 1
 2
 3
 4
 5
 6
 7
 8
 9
10
11
12
13
14
15
curl -X POST "https://api.moov.io/transfer-options" \
  -H 'Authorization: Bearer {token}' \
  -H "Origin: https://api.moov.io" \
  --data-raw '{
    "source": {
      "accountId": "UID",
    },
    "destination": {
      "accountId": "UID",
    },
    "amount": {
      "value": 100,
      "currency": "usd"
    }
  }'\

Make the transfer

To initiate a transfer, provide the two payment method IDs and the amount you want to send.

 1
 2
 3
 4
 5
 6
 7
 8
 9
10
11
12
13
14
const moov = new Moov({});

const transfer = await moov.transfers.create({
  source: {
    paymentMethodID: "SOURCE_PAYMENT_METHOD_ID",
  },
  destination: {
    paymentMethodID: "DESTINATION_PAYMENT_METHOD_ID",
  },
  amount: {
    value: 100,
    currency: "USD"
  },
});
 1
 2
 3
 4
 5
 6
 7
 8
 9
10
11
12
13
14
15
16
17
curl -X GET "https://api.moov.io/transfers" \
  -H 'Authorization: Bearer {token}' \
  -H "Origin: https://api.moov.io" \
  -H "X-Wait-For: rail-response" \
  --data-raw '{
    "source": {
      "paymentMethodID": "UID",
    },
    "destination": {
      "paymentMethodID": "UID",
    },
    "amount": {
      "value": 100,
      "currency": "usd"
    },
    "description": "Paying Jules for last 4 classes"
  }'\

FAQ

I’m getting a 401 unauthorized error while making an API call. How should I troubleshoot this?
There are a number of possible reasons for a 401 unauthorized error. Troubleshoot the error by making sure you have:

If you are still getting an error, please write a support ticket and provide the x-request-id response header from your request so our team can troubleshoot further.

I’ve received a CORS error or failed request. What do I do?
To troubleshoot a CORS error or a failed request, make sure to check you’ve done the following:
  • Sent your request coming from a secure https domain. Note that localhost is not secure, even if it displays as https in your browser.
  • Included the domain sending the request in the allowed domain list for your Moov API key
  • Generated an access token that includes all the required scopes for your request
  • Included the generated access token in your request header

What’s next

You’ve just moved money! Take a look at webhooks to learn how to subscribe to events that take place in your Moov integration.

Once you’ve gotten set up, you can continue to make transfers or accept payments. You can also customize your account settings, add team members, and manage roles and permissions in the Moov dashboard. Feel free to explore our API reference to see example requests/responses or get more context on a particular endpoint.