With Moov, you can build a checkout flow for accepting payments. For example, merchants selling goods or services through your platform may want to take card payments from their customers. In this guide, we cover the steps for setting up card acceptance.
For the purposes of this guide, we’ll assume the following key players:
Your Moov account: A platform facilitating the card payments
Merchant: The account taking card payments. This will be the destination for the Moov transfer.
Cardholder/Customer: The account being charged. This will be the source for the Moov transfer.
This guide covers using Moov Drops or Moov.js to onboard your merchants and cardholders, so you’ll need to get started by installing Moov.js. There are two different ways to install Moov.js. You can do a script based installation, or initialize the package via npm.
import{loadMoov}from'@moovio/moov-js';constmoovAccessToken=awaitfetch(...);// Use your server to get a Moov access token with appropriate scopes
constmoov=awaitloadMoov(moovAccessToken);
Assuming you’ve already completed a basic setup of your Moov account, you’ll need to create an access token using your API key, which you can get from the Moov Dashboard. You will include a new access token as the Moov Drop onboarding.token whenever you onboard merchants or cardholders.
1
2
3
4
5
6
7
8
9
10
11
12
13
14
15
16
import{Moov,SCOPES}from'@moovio/node';constmoov=newMoov({accountID:"YOUR_MOOV_ACCOUNT_ID",publicKey:"PUBLIC_KEY",secretKey:"PRIVATE_KEY",domain:"YOUR_DOMAIN"});constscopes=[SCOPES.ACCOUNTS_CREATE];try{const{token}=awaitmoov.generateToken(scopes);// Do something with token
}catch(err){// Handle any errors
}
Card payments are modeled as a transfer from a source to a destination. In the card acceptance use case, the source is a cardholder and the destination is a merchant.
As the platform, you are facilitating card payments on behalf of your merchants. You will start by setting up Moov accounts for your merchants. Your merchants will be subject to identity verification. You have three different options for doing this:
Option 2: Collect the necessary information from your merchants using Moov.js and your own UI.
Option 3: Use the API directly via our Node SDK. Note that when using our server-side Node SDK to onboard a sender, you can use the same code as you would when using Moov.js because the method names are the same.
// Onboarding Moov Drop
constonboarding=document.querySelector('moov-onboarding');// After generating a token, set it on the onboarding element
onboarding.token='some-generated-token';// Include your own accountID which can be found in the Moov Dashboard
onboarding.facilitatorAccountID='your-account-id';// Transfers and collect-funds capabilities are needed for this flow.
onboarding.capabilities=['transfers','collect-funds'];// Funding will occur with a bank account
onboarding.paymentMethodTypes=['bankAccount'];// Verify bank account with microdeposits
onboarding.microDeposits=true;// Follow the Onboarding Moov Drops and Plaid guides if linking bank accounts using Plaid.
// Open the onboarding flow when ready
onboarding.open=true;
// create Moov instance with generated token
constmoov=Moov('some-generated-token');// create Moov account, likely on form submit
moov.accounts.create({accountType:'business',profile:{business:{}},capabilities:['transfers','send-funds']}).then((account)=>{console.log(account);}).catch((err)=>{console.error(err);});// Generate a new token server-side with the accountID and update the token within your frontend app. You can chain methods together
moov.setToken('new-token');// add a representative to account
moov.accounts.representatives.create({accountID:'newly-created-accountID',representative:{}});// link a bank account
moov.accounts.bankAccounts.link({accountID:'newly-created-accountID',bankAccount:{holderName:'Name',holderType:'business',accountNumber:'0004321567000',routingNumber:'123456789',bankAccountType:'checking'}}).then((bankAccount)=>{// kick off micro-deposit verification
moov.accounts.bankAccounts.startMicroDepositVerification({accountID,bankAccountID});});// Later, verify micro-deposits
moov.accounts.bankAccounts.completeMicroDepositVerification({accountID,bankAccountID,[12,45]});// Asychronously, the ach-debit-fund payment method will be created from this verified bank account. If you want to move funds out of the Moov wallet, this bank account can be the destination of a wallet-to-bank transfer.
Once the customer is prompted to pay, you can onboard them with Moov.js and create an account that will automatically request the transfers capability.
To link the customer’s card to their Moov account, you can use the pre-built Card Link Moov Drop in an HTML document as shown below and include the token you generated in the previous step:
<moov-card-linkclass="card-link"></moov-card-link><script>letmoovCardLink=document.querySelector('moov-card-link');moovCardLink.accountID='accountID';moovCardLink.oauthToken='oauthToken';moovCardLink.onSuccess=(card)=>{console.log('Card linked');// now show a success screen
}moovCardLink.onError=(error)=>{console.log('Error linking card');// now show an error screen
}// call submit when button is pressed
moovCardLink.submit();</script>
Once the information has been submitted, Moov verifies the card details with card networks. You will not be responsible for storing or handling any of the card data, since all PII goes directly to Moov.
All payments initially settle to a merchant’s Moov wallet account. Funds can then be moved to an external bank account using a wallet-to-bank transfer.
The customer’s card will be the source of funds, so we’ll need the card-payment payment method that was created after they linked their card. You can obtain the paymentmethodID from the payment methods endpoint by using the cardID as the sourceID.
Since the merchant’s wallet will be the destination of the funds, we will need the moov-wallet payment method. You can obtain the paymentmethodID by listing payment methods and finding the moov-wallet payment method associated with the merchant account.
To facilitate a card payment, create a transfer from the cardholder (source) to the merchant (destination).
You can set the default statement descriptor for a merchant by using the account.settings.cardPayment.statementDescriptorfield in the PATCHaccounts endpoint.
Optionally, source.cardDetails.dynamicDescriptor in the CREATEtransfer endpoint allows a merchant to pass information to the card issuer at the time of transaction. The card issuer will then use this information to generate a description of the cardholder’s statement.
If you want to monetize your payment flows, you can collect facilitator fees on card transfers. The amount specified will be deducted from the payment so that the destination receives the transfer amount net of fees. The fee amount is credited to your Moov wallet once the transfer is completed.
The FacilitatorFee field in the transfer request gives you the option to:
Implement your own customer-facing fee structure
Pass along your costs
For more information on facilitator fees and other fee structures, read our guide on fees here.
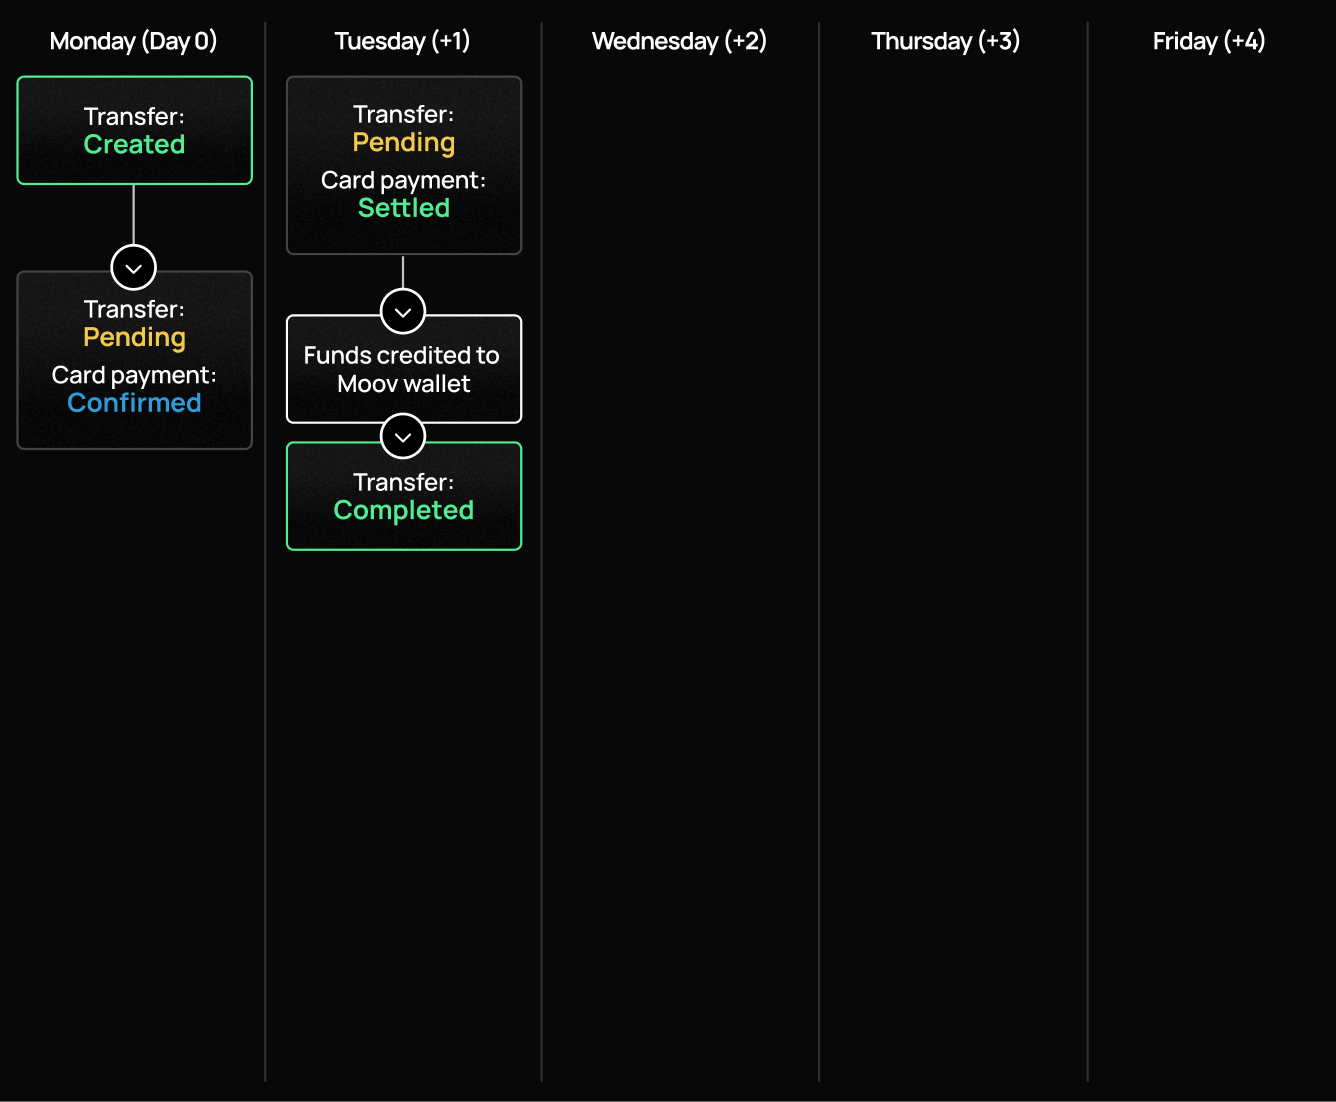
After creation, the overall transfer status will be pending until the funds are disbursed to the destination moov-wallet. The following business day, Moov receives settlement for the transactions from the card networks and then disburses the funds to the merchant’s wallet.
The X-Wait-For header waits until the card network has approved or declined the response and will provide you with a synchronous response in real-time. When you use this header, it will return the whole transfer object in the response. The platform should then look at cardDetails.status to ascertain the status of the payment.
confirmed = successfully authorized
failed = declined or failed for an unknown reason.
You can check on the status of the transfer at any time using the GET transfers endpoint. You can view detailed information about card processing in the cardDetails sub-object:
1
2
3
4
5
6
7
{"source":{"cardDetails":{"status":"confirmed"}}}
You can also check on the status of the transfer by subscribing to the transfer.updatedwebhook.
For a sense of card-to-wallet transfer timing, see the diagram below.